根据要求需要把去年的新生电子报到系统由boot升级为cloud,把服务拆分做成分布式,这篇博客记录从0开始拆分并搭建分布式新生电子报到系统(不涉及业务源代码),并记录在使用技术栈和搭建过程中遇到的问题
主要技术栈选型
- Spring Boot 2.2.4 (父工程)
- Spring Cloud Hoxton.SR1 (父工程)
- Spring Cloud Alibaba 2.2.0.RELEASE (父工程)
- Nacos:用于服务注册发现,以及分布式配置中心(v2.0.2)
- Gateway:网关,请求的分发,配合nacos
- OpenFeign:用于服务的远程过程调用,自带ribbon实现负载均衡(轮询)
- Seata:用于分布式事务控制(v1.4.2)
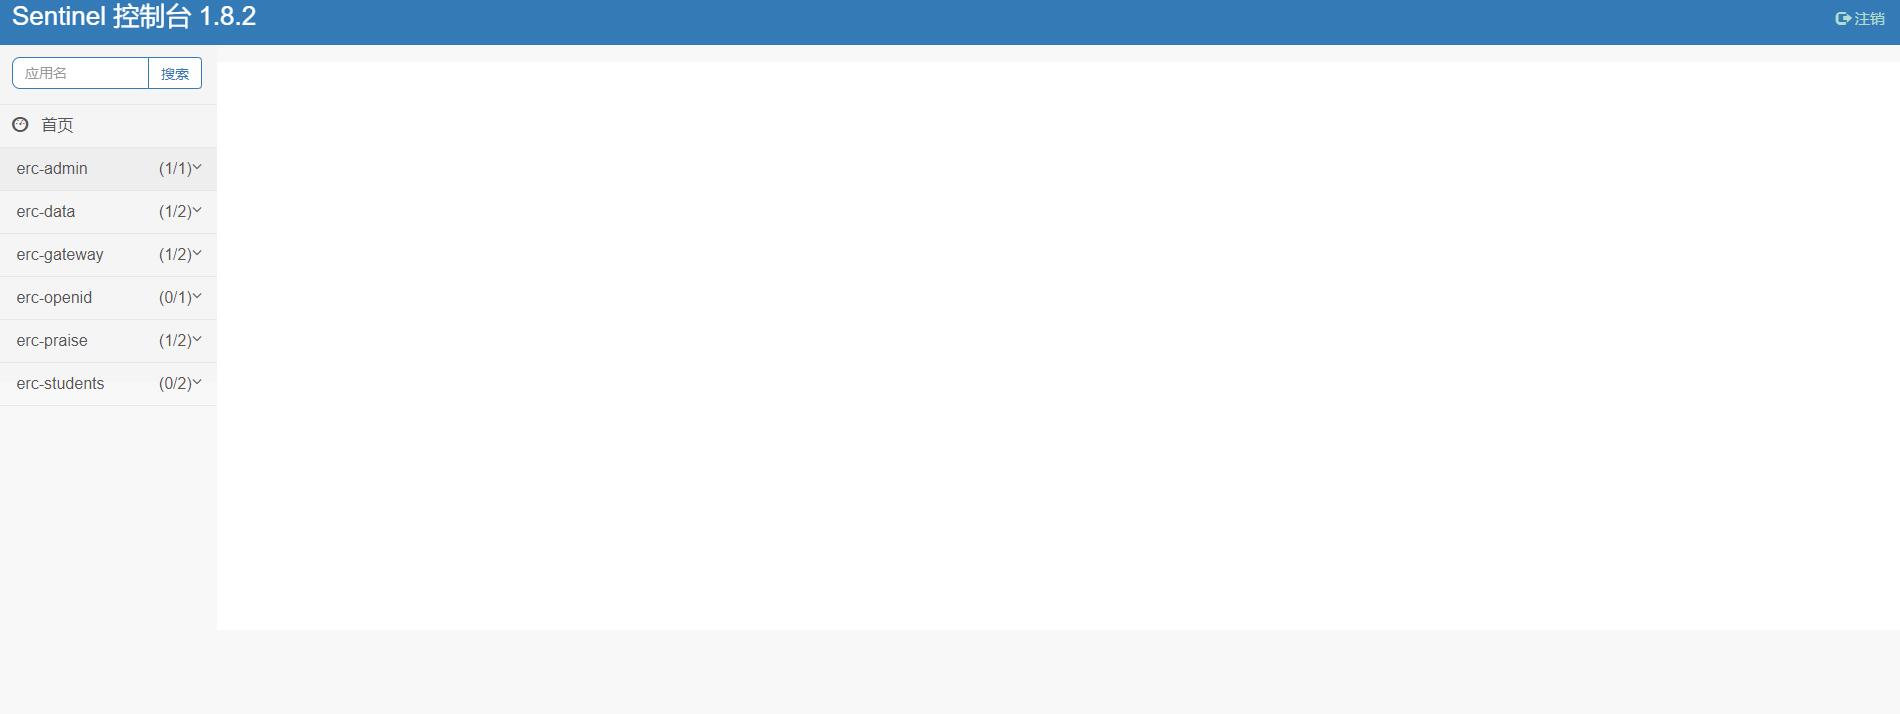
- Sentinel:用于服务限流、熔断监控(v1.8.2)
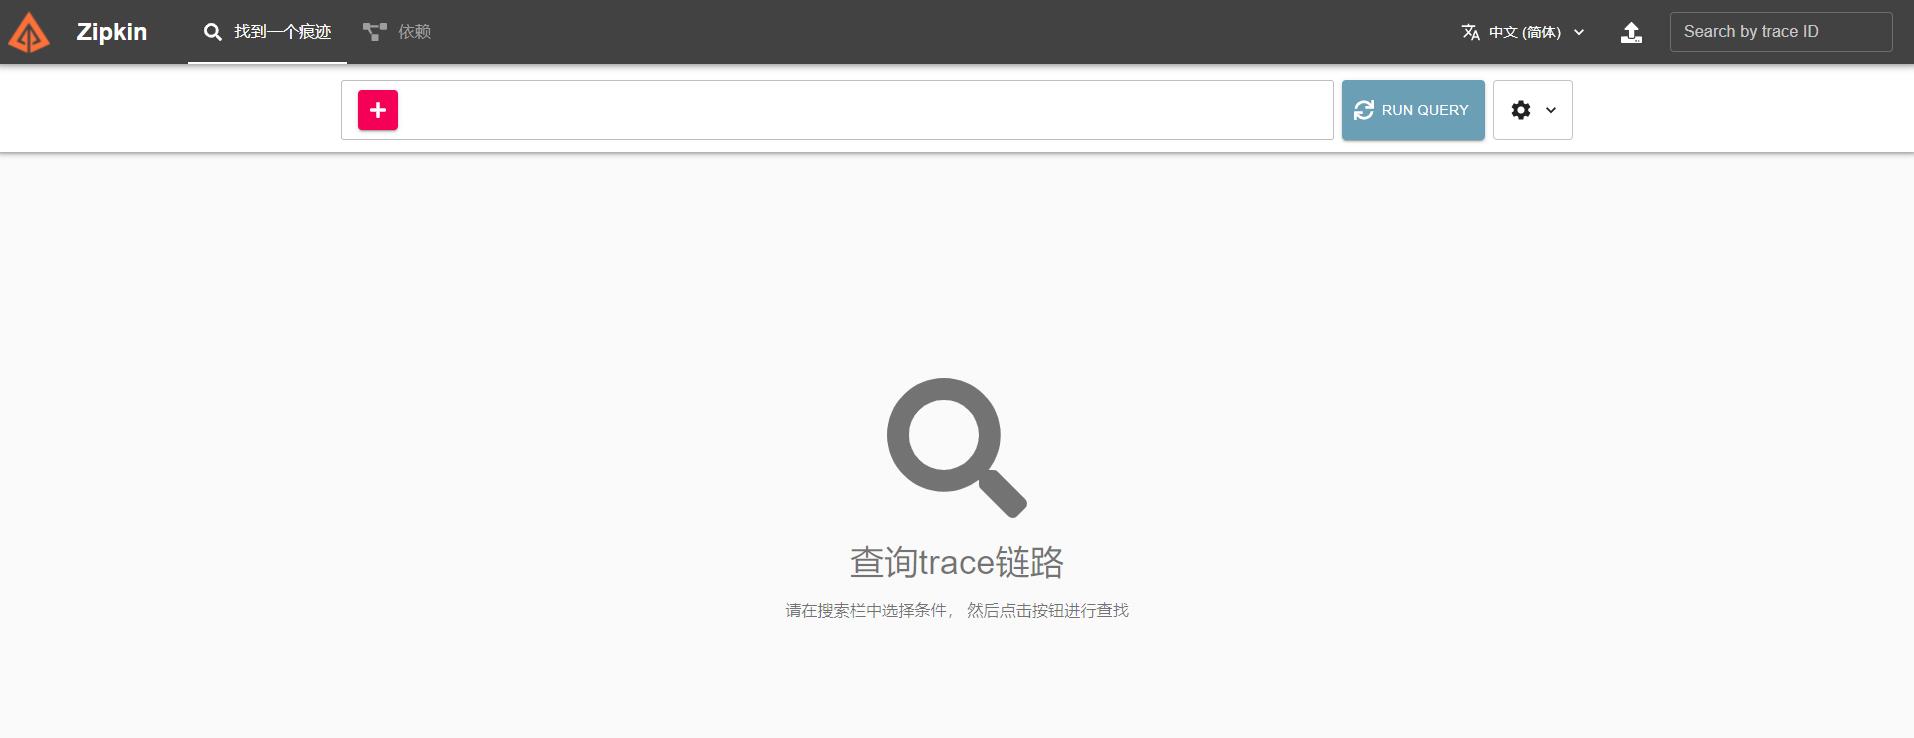
- Zipkin + Sleuth:服务链路追踪
- Spring Boot Admin:服务状态监控 (v2.3.0)
基础服务搭建
Nacos
- 至于为什么不用zookeeper,先用nacos香一香再说
- 下载nacos v1.4.2之后解压,只要做两件事:修改数据库、单机启动:
修改数据库 - 已我本地的mysql8.0.22数据库为例,新建一个数据库nacos,导入
nacos/conf/ncos-mysql.sql,修改nacos/conf/application.properties,在最后加上5行代码:spring.datasource.platform=mysql db.num=1 db.url.0=jdbc:mysql://localhost:3306/nacos?useUnicode=true&characterEncoding=UTF-8&useJDBCCompliantTimezoneShift=true&useLegacyDatetimeCode=false&serverTimezone=UTC&useSSL=false&allowPublicKeyRetrieval=true db.user=root db.password=12345这样之后nacos的一些列配置都持久化到了自己的数据库,而不是自带的derby数据库
单机启动 - 这里以单机standalone启动为例,到/nacos/bin目录下打开cmd窗口,运行
startup.cmd -m standalone
Seata
- 我使用的版本是1.4.2的,还是比较麻烦的,需要下载源码包
seata-1.4.2.zip和服务端包seata-server-1.4.2。 - 仅服务端的前期工作一共要做5件事:
- 为seata建数据库,导sql
- 修改两个配置文件file.conf和registry.conf
- 在源码包中修改config.txt,并导入nacos配置中心(建议单独给seata建立命名空间)
- 给需要进行全局事务控制的数据库导入undo_log表
- 双击seata-server.bat启动
-
这里我依旧在本机上的mysql中建立一个数据库名为seata,导入的sql文件在源码包下的
script\server\db\mysql.sql -
导入完成后这里建议更改seata数据库中的global_table表的transaction_service_group字段长度改为64,以免全局事务开启时报错提示长度问题
修改两个配置文件file.conf和registry.conf -
更改服务端包下
/conf/file.conf,主要修改:mode = "db" db { datasource = "druid" dbType = "mysql" ## mysql 8.0 driverClassName = "com.mysql.cj.jdbc.Driver" url = "jdbc:mysql://localhost:3306/seata?useUnicode=true&characterEncoding=UTF-8&useJDBCCompliantTimezoneShift=true&useLegacyDatetimeCode=false&serverTimezone=UTC&useSSL=false&allowPublicKeyRetrieval=true&rewriteBatchedStatements=true" user = "root" password = "12345" minConn = 5 maxConn = 100 globalTable = "global_table" branchTable = "branch_table" lockTable = "lock_table" queryLimit = 100 maxWait = 5000 } -
更改服务端包下
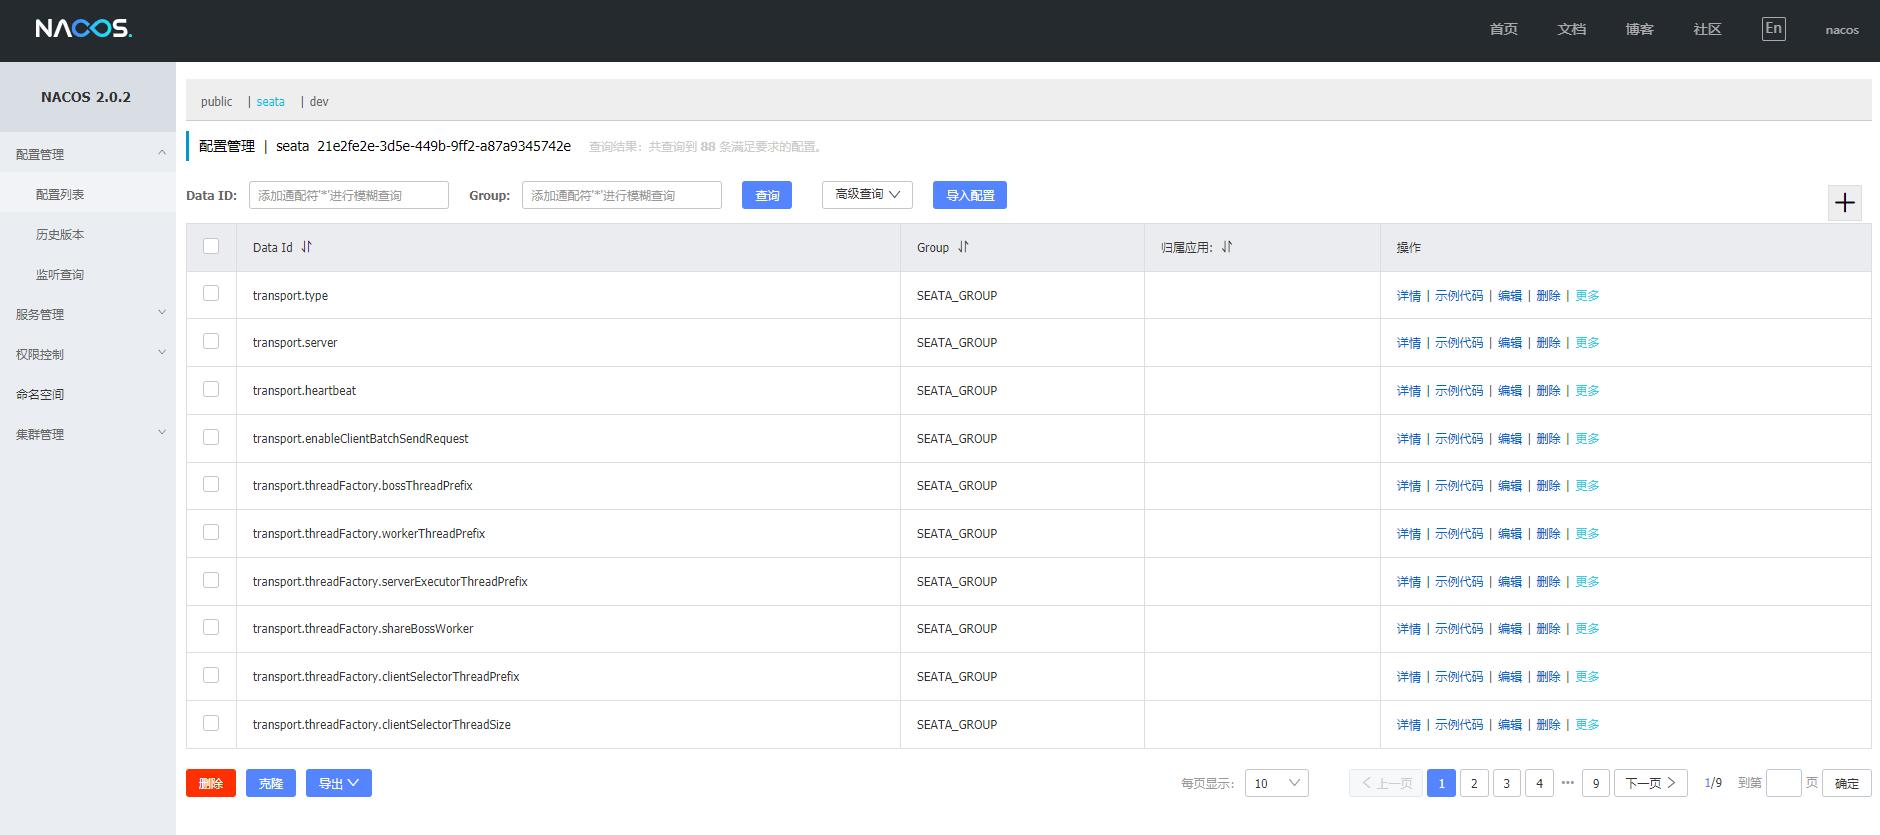
/conf/registry.conf,主要修改:registry { type = "nacos" nacos { application = "seata-server" serverAddr = "127.0.0.1:8848" group = "SEATA_GROUP" namespace = "21e2fe2e-3d5e-449b-9ff2-a87a9345742e" cluster = "default" username = "nacos" password = "nacos" } } config { type = "nacos" nacos { serverAddr = "127.0.0.1:8848" namespace = "21e2fe2e-3d5e-449b-9ff2-a87a9345742e" group = "SEATA_GROUP" username = "nacos" password = "nacos" dataId = "seataServer.properties" } -
其中
21e2fe2e-3d5e-449b-9ff2-a87a9345742e是我单独在nacos中建立的命名空间,用于之后导入seata配置(配置内容比较多,多达9页,默认全部导入public命名空间)
在源码包中修改config.txt,并导入nacos配置中心 -
修改源码包中的
/script/config-center/config.txt:store.mode=db store.db.datasource=druid store.db.dbType=mysql store.db.driverClassName=com.mysql.cj.jdbc.Driver store.db.url=jdbc:mysql://localhost:3306/seata?useUnicode=true&characterEncoding=UTF-8&useJDBCCompliantTimezoneShift=true&useLegacyDatetimeCode=false&serverTimezone=UTC&useSSL=false&allowPublicKeyRetrieval=true&rewriteBatchedStatements=true store.db.user=root store.db.password=12345 -
其余尽量不要修改,大家额外需要关注的一个参数是
service.vgroupMapping.my_test_tx_group=default,其中my_test_tx_group即为分布式事务中的TC集群名称,可以是自定义的,比如my_dev_tx_group等等,也可以多加几个不同的:service.vgroupMapping.seata-storage-service-group=default service.vgroupMapping.seata-account-service-group=default service.vgroupMapping.seata-order-service-group=default -
这些都会导入到nacos配置中心,我们在那里也可以修改,但要保证项目中的yml里的
tx-service-group:后面的值需要和nacos里面的TC集群名保持一致,例如nacos里有service.vgroupMapping.my_test_tx_group,这里就需要填写tx-service-group: my_test_tx_group。 -
可以多个服务都用不同的TC集群名,也都可以使用同一个,具体的解释官网是这么说的:
事务分组说明。
1.事务分组是什么?
事务分组是seata的资源逻辑,类似于服务实例。在file.conf中的my_test_tx_group就是一个事务分组。
2.通过事务分组如何找到后端集群?
首先程序中配置了事务分组(GlobalTransactionScanner 构造方法的txServiceGroup参数),程序会通过用户配置的配置中心去寻找service.vgroupMapping
.事务分组配置项,取得配置项的值就是TC集群的名称。拿到集群名称程序通过一定的前后缀+集群名称去构造服务名,各配置中心的服务名实现不同。拿到服务名去相应的注册中心去拉取相应服务名的服务列表,获得后端真实的TC服务列表。
3.为什么这么设计,不直接取服务名?
这里多了一层获取事务分组到映射集群的配置。这样设计后,事务分组可以作为资源的逻辑隔离单位,当发生故障时可以快速failover。 -
修改完之后打开GitBash,打开到目录
script\config-center\nacos下,运行sh nacos-config.sh -h localhost -p 8848 -g SEATA_GROUP -t 21e2fe2e-3d5e-449b-9ff2-a87a9345742e -u nacos -w nacos -
其中-t后是命名空间,如果你使用默认的public就去掉该参数
给需要进行全局事务控制的数据库导入undo_log表DROP TABLE IF EXISTS `undo_log`; CREATE TABLE `undo_log` ( `id` bigint NOT NULL AUTO_INCREMENT, `branch_id` bigint NOT NULL, `xid` varchar(100) CHARACTER SET utf8 COLLATE utf8_general_ci NOT NULL, `context` varchar(128) CHARACTER SET utf8 COLLATE utf8_general_ci NOT NULL, `rollback_info` longblob NOT NULL, `log_status` int NOT NULL, `log_created` datetime(0) NOT NULL, `log_modified` datetime(0) NOT NULL, `ext` varchar(100) CHARACTER SET utf8 COLLATE utf8_general_ci NULL DEFAULT NULL, PRIMARY KEY (`id`) USING BTREE, UNIQUE INDEX `ux_undo_log`(`xid`, `branch_id`) USING BTREE ) ENGINE = InnoDB CHARACTER SET = utf8 COLLATE = utf8_general_ci ROW_FORMAT = Dynamic;SET FOREIGN_KEY_CHECKS = 1;
- 当然需要先启动nacos。
Sentinel和Zipkin
- 这两个都是jar包,作为服务端没有什么配置的,下下来直接java -jar 启动即可。
- Sentinel下载地址、Zipkin下载地址
项目搭建
父工程搭建
- 父工程pom:
<?xml version="1.0" encoding="UTF-8"?>
<project xmlns="http://maven.apache.org/POM/4.0.0"
         xmlns:xsi="http://www.w3.org/2001/XMLSchema-instance"
         xsi:schemaLocation="http://maven.apache.org/POM/4.0.0 http://maven.apache.org/xsd/maven-4.0.0.xsd">
    <modelVersion>4.0.0</modelVersion>

    <groupId>zone.jiefei</groupId>
    <artifactId>electronic-registration-cloud</artifactId>
    <packaging>pom</packaging>
    <version>1.0-SNAPSHOT</version>
    <modules>
        <module>erc-common</module>
        <module>erc-admin</module>
        <module>erc-gateway</module>
        <module>erc-openid</module>
        <module>erc-student</module>
        <module>erc-praise</module>
        <module>erc-data</module>
        <module>erc-student2</module>
        <module>erc-monitor</module>
    </modules>

    <!-- 统一管理jar包版本 -->
    <properties>
        <project.build.sourceEncoding>UTF-8</project.build.sourceEncoding>
        <maven.compiler.source>1.8</maven.compiler.source>
        <maven.compiler.target>1.8</maven.compiler.target>
        <junit.version>4.12</junit.version>
        <mybatis.plus.version>3.3.2</mybatis.plus.version>
        <log4jdbc.version>1.16</log4jdbc.version>
        <velocity.version>2.2</velocity.version>
        <lombok.version>1.16.18</lombok.version>
        <mysql.version>8.0.12</mysql.version>
        <druid.version>1.1.16</druid.version>
        <mybatis.spring.boot.version>1.3.2</mybatis.spring.boot.version>
        <swagger.version>2.9.2</swagger.version>
        <hutool.version>5.2.5</hutool.version>
    </properties>

    <!-- 子模块继承之后,提供作用:锁定版本+子module不用写groupId和version -->
    <dependencyManagement>
        <dependencies>
            <!-- Spring boot 2.2.4 -->
            <dependency>
                <groupId>org.springframework.boot</groupId>
                <artifactId>spring-boot-dependencies</artifactId>
                <version>2.2.4.RELEASE</version>
                <type>pom</type>
                <scope>import</scope>
            </dependency>

            <!-- Spring cloud Hoxton.SR1 -->
            <dependency>
                <groupId>org.springframework.cloud</groupId>
                <artifactId>spring-cloud-dependencies</artifactId>
                <version>Hoxton.SR1</version>
                <type>pom</type>
                <scope>import</scope>
            </dependency>

            <!-- Spring cloud alibaba 2.2.0.RELEASE -->
            <dependency>
                <groupId>com.alibaba.cloud</groupId>
                <artifactId>spring-cloud-alibaba-dependencies</artifactId>
                <version>2.2.0.RELEASE</version>
                <type>pom</type>
                <scope>import</scope>
            </dependency>

            <!-- 和数据库相关 -->
            <dependency>
                <groupId>mysql</groupId>
                <artifactId>mysql-connector-java</artifactId>
                <version>${mysql.version}</version>
            </dependency>

            <dependency>
                <groupId>com.alibaba</groupId>
                <artifactId>druid</artifactId>
                <version>${druid.version}</version>
            </dependency>

            <dependency>
                <groupId>com.alibaba</groupId>
                <artifactId>druid-spring-boot-starter</artifactId>
                <version>1.1.10</version>
            </dependency>

            <!--    mybatis plus相关  start  -->
            <dependency>
                <groupId>com.baomidou</groupId>
                <artifactId>mybatis-plus-boot-starter</artifactId>
                <version>${mybatis.plus.version}</version>
            </dependency>
            <dependency>
                <groupId>com.baomidou</groupId>
                <artifactId>mybatis-plus-generator</artifactId>
                <version>${mybatis.plus.version}</version>
            </dependency>
            <dependency>
                <groupId>org.apache.velocity</groupId>
                <artifactId>velocity-engine-core</artifactId>
                <version>${velocity.version}</version>
            </dependency>

            <dependency>
                <groupId>org.projectlombok</groupId>
                <artifactId>lombok</artifactId>
                <version>${lombok.version}</version>
                <optional>true</optional>
            </dependency>

            <!--接口文档-->
            <dependency>
                <groupId>io.springfox</groupId>
                <artifactId>springfox-swagger2</artifactId>
                <version>${swagger.version}</version>
                <exclusions>
                    <exclusion>
                        <groupId>io.swagger</groupId>
                        <artifactId>swagger-annotations</artifactId>
                    </exclusion>
                    <exclusion>
                        <groupId>io.swagger</groupId>
                        <artifactId>swagger-models</artifactId>
                    </exclusion>
                </exclusions>
            </dependency>
            <dependency>
                <groupId>io.swagger</groupId>
                <artifactId>swagger-annotations</artifactId>
                <version>1.5.21</version>
            </dependency>
            <dependency>
                <groupId>io.swagger</groupId>
                <artifactId>swagger-models</artifactId>
                <version>1.5.21</version>
            </dependency>
            <dependency>
                <groupId>io.springfox</groupId>
                <artifactId>springfox-swagger-ui</artifactId>
                <version>${swagger.version}</version>
            </dependency>

            <!--工具包-->
            <dependency>
                <groupId>cn.hutool</groupId>
                <artifactId>hutool-all</artifactId>
                <version>${hutool.version}</version>
            </dependency>

            <!-- 测试与日志 -->
            <dependency>
                <groupId>junit</groupId>
                <artifactId>junit</artifactId>
                <version>${junit.version}</version>
            </dependency>

            <dependency>
                <groupId>log4j</groupId>
                <artifactId>log4j</artifactId>
                <version>${log4j.version}</version>
            </dependency>
        </dependencies>
    </dependencyManagement>
</project>
基础模块搭建
- 该模块整合项目中公共的工具类、注解、过滤器、拦截器、配置等。
-
pom依赖:
<dependencies> <!-- GateWay,排斥web --> <dependency> <groupId>org.springframework.cloud</groupId> <artifactId>spring-cloud-starter-gateway</artifactId> </dependency> <!-- sleuth + zipkin --> <dependency> <groupId>org.springframework.cloud</groupId> <artifactId>spring-cloud-starter-zipkin</artifactId> </dependency> <!-- SpringCloud alibaba nacos --> <dependency> <groupId>com.alibaba.cloud</groupId> <artifactId>spring-cloud-starter-alibaba-nacos-discovery</artifactId> </dependency> <dependency> <groupId>com.alibaba.cloud</groupId> <artifactId>spring-cloud-starter-alibaba-nacos-config</artifactId> </dependency> <!-- sentinel-datasource-nacos 后续持久化会用到 --> <dependency> <groupId>com.alibaba.csp</groupId> <artifactId>sentinel-datasource-nacos</artifactId> </dependency> <!-- sentinel --> <dependency> <groupId>com.alibaba.cloud</groupId> <artifactId>spring-cloud-starter-alibaba-sentinel</artifactId> </dependency> <dependency> <groupId>com.alibaba.csp</groupId> <artifactId>sentinel-spring-cloud-gateway-adapter</artifactId> </dependency> <dependency> <groupId>org.springframework.boot</groupId> <artifactId>spring-boot-devtools</artifactId> <scope>runtime</scope> <optional>true</optional> </dependency> <dependency> <groupId>org.projectlombok</groupId> <artifactId>lombok</artifactId> <optional>true</optional> </dependency> <dependency> <groupId>org.springframework.boot</groupId> <artifactId>spring-boot-starter-test</artifactId> <scope>test</scope> </dependency> <dependency> <groupId>org.springframework.boot</groupId> <artifactId>spring-boot-starter-actuator</artifactId> </dependency> </dependencies> -
所有的模块统一两个配置文件:
application.yml和bootstrap.yml,其余都在配置中心上。 -
application.yml:
spring: profiles: active: dev -
bootstrap.yml:
server: port: 9527 spring: application: name: erc-gateway cloud: nacos: discovery: server-addr: 127.0.0.1:8848 # Nacos服务注册中心地址 config: server-addr: 127.0.0.1:8848 # Nacos作为配置中心地址 file-extension: yml group: DEFAULT_GROUP namespace: 475d292d-7571-445c-be85-7b7fe0786a1a # 自定义命名空间 -
nacos上的配置:
spring: zipkin: base-url: http://localhost:9411 sleuth: sampler: probability: 1 cloud: nacos: discovery: server-addr: 127.0.0.1:8848 sentinel: transport: # 配置Sentinel dashboard地址 dashboard: 127.0.0.1:8080 # 默认8719端口,假如被占用会自动从8719开始依次+1扫描,直至找到未被占用的端口 port: 8719 gateway: discovery: locator: enabled: true #开启从注册中心动态创建路由的功能,利用微服务名进行路由 globalcors: cors-configurations: '[/**]': # 允许携带认证信息 # 允许跨域的源(网站域名/ip),设置*为全部 # 允许跨域请求里的head字段,设置*为全部 # 允许跨域的method, 默认为GET和OPTIONS,设置*为全部 # 跨域允许的有效期 allow-credentials: true allowed-origins: "*" allowed-headers: "*" allowed-methods: - OPTIONS - GET - POST - DELETE - PUT # max-age: 3600 # 允许response的head信息 # 默认仅允许如下6个: # Cache-Control # Content-Language # Content-Type # Expires # Last-Modified # Pragma #exposed-headers: routes: - id: admin_routh #路由的ID,没有固定规则但要求唯一,建议配合服务名 uri: lb://erc-admin #匹配后提供服务的路由地址 predicates: - Path=/api/admin/** - id: openid_routh uri: lb://erc-openid predicates: - Path=/api/login/** - id: students_routh uri: lb://erc-students predicates: - Path=/api/students/** - id: praise_routh uri: lb://erc-praise predicates: - Path=/api/studentPraise/** - id: data_routh uri: lb://erc-data predicates: - Path=/api/ScreenData/** management: endpoints: web: exposure: include: "*" endpoint: health: show-details: ALWAYS -
单独配置类:
@Slf4j
@Configuration
public class GatewaySentinelConfiguration {

  private final List<ViewResolver> viewResolvers;
  private final ServerCodecConfigurer serverCodecConfigurer;

  public GatewaySentinelConfiguration(ObjectProvider<List<ViewResolver>> viewResolversProvider,
                                      ServerCodecConfigurer serverCodecConfigurer) {
      this.viewResolvers = viewResolversProvider.getIfAvailable(Collections::emptyList);
      this.serverCodecConfigurer = serverCodecConfigurer;
  }
  /**
   * 配置 限流后异常处理  使用 SentinelGatewayBlockExceptionHandler
   * @return
   */
  @Bean
  @Order(Ordered.HIGHEST_PRECEDENCE)
  public SentinelGatewayBlockExceptionHandler sentinelGatewayBlockExceptionHandler() {
      // Register the block exception handler for Spring Cloud Gateway.
      return new SentinelGatewayBlockExceptionHandler(viewResolvers, serverCodecConfigurer);
  }

  /**
   * 配置SentinelGatewayFilter
   * @return
   */
  @Bean
  @Order(-1)
  public GlobalFilter sentinelGatewayFilter() {
      return new SentinelGatewayFilter();
  }

  /**
   *  自定义异常返回
   *  限流异常重新定义BlockExceptionHandler的返回
   *  对应接口为 BlockRequestHandler。默认实现为 DefaultBlockRequestHandler,
   *  当被限流时会返回类似于下面的错误信息:Blocked by Sentinel: FlowException
   * @author weijb
   * @date 2020/11/24 13:24
   * @param
   * @return void
   */
//    @PostConstruct
//    public void initBlockRequestHandler(){
//        BlockRequestHandler blockRequestHandler = (serverWebExchange, throwable) -> ServerResponse.status(HttpStatus.OK)
//                .contentType(MediaType.APPLICATION_JSON)
//                .body(BodyInserters.fromValue(Result.custom(ResultCode.SYSTEM_RESOURCE_EXHAUSTION)));
//        GatewayCallbackManager.setBlockHandler(blockRequestHandler);
//    }
}
-
该模块为Spring Boot Admin的服务端:
-
pom依赖:
<dependencies> <!-- SpringCloud alibaba nacos --> <dependency> <groupId>com.alibaba.cloud</groupId> <artifactId>spring-cloud-starter-alibaba-nacos-discovery</artifactId> </dependency> <dependency> <groupId>com.alibaba.cloud</groupId> <artifactId>spring-cloud-starter-alibaba-nacos-config</artifactId> </dependency> <dependency> <groupId>de.codecentric</groupId> <artifactId>spring-boot-admin-starter-server</artifactId> <version>2.3.0</version> </dependency> <dependency> <groupId>org.springframework.boot</groupId> <artifactId>spring-boot-starter-web</artifactId> </dependency> <dependency> <groupId>org.springframework.boot</groupId> <artifactId>spring-boot-starter-security</artifactId> </dependency> </dependencies> -
单独一个配置类(无nacos):
server: port: 9300 spring: application: name: erc-monitor cloud: nacos: discovery: server-addr: 127.0.0.1:8848 # Nacos服务注册中心地址 management: endpoints: web: exposure: include: "*" endpoint: health: show-details: ALWAYS -
启动类:
@Configuration @EnableAutoConfiguration @EnableDiscoveryClient @EnableAdminServer public class MonitorStartApp { public static void main(String[] args) { SpringApplication.run(MonitorStartApp.class, args); } @Configuration public static class SecurityPermitAllConfig extends WebSecurityConfigurerAdapter { @Override protected void configure(HttpSecurity http) throws Exception { http.authorizeRequests().anyRequest().permitAll() .and().csrf().disable(); } } } -
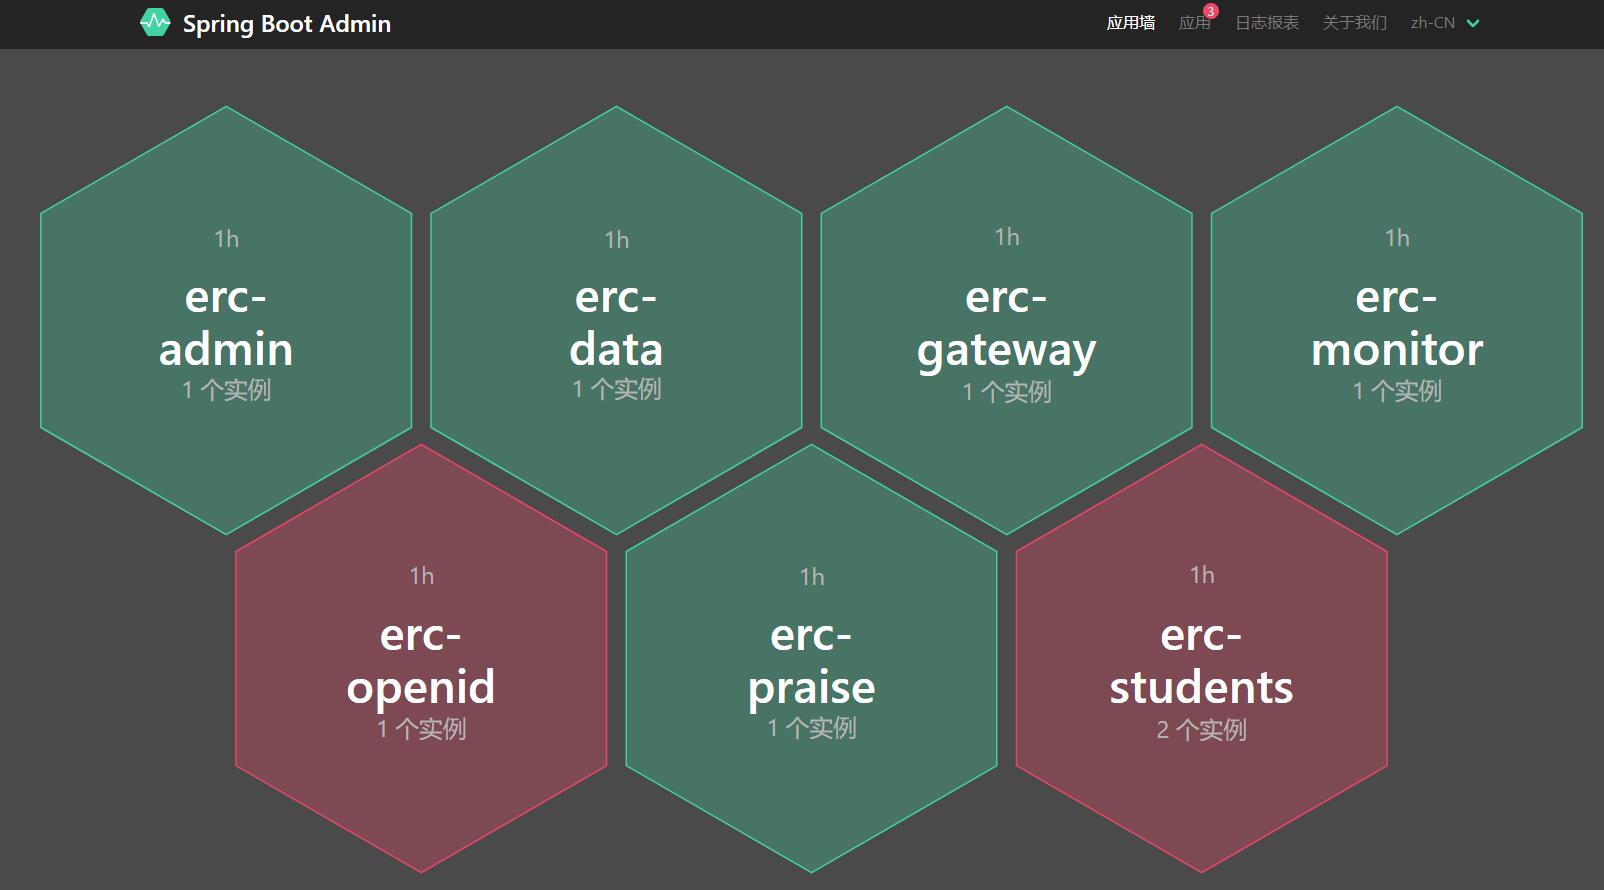
在Spring Boot Admin监控服务启动后又是一个监控页面:

服务模块拆分
先大概说一下项目的需求,其实很简单,新生扫码填写信息完成报到,其他人可以扫码对某个新生进行祝福(点赞),各专业报到数据、总数据、报到排行、祝福排行会展示在大屏上。
-
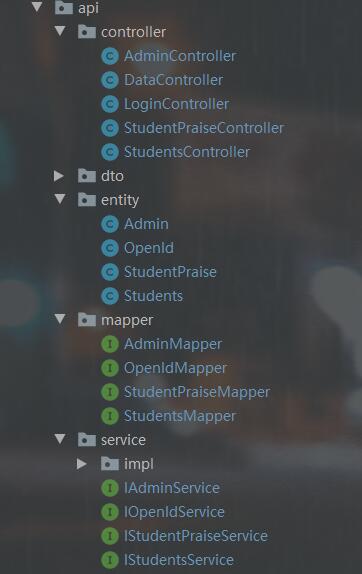
在一开始的boot项目中,只有一个数据库,一共4张表:
admin、open_id、students、student_praise。(为什么那个students用复数?因为这不是我建的表,我也不想改代码...) -
对应的service也是4个,其中AdminService是登录,对应的controller只有一个登录接口,
open_id这个表只有一个字段用来记录微信用户的openid,对应的controller只有一个接口,插入openid。student_praise表有两个字段,一个用来记录新生身份证号,一个记录祝福人的openid,对应的controller也只有一个接口(一个openid对一个人只能祝福一次)。
-
很显然这三个服务较为简单,我将四个表也直接分到了四个数据库中:

-
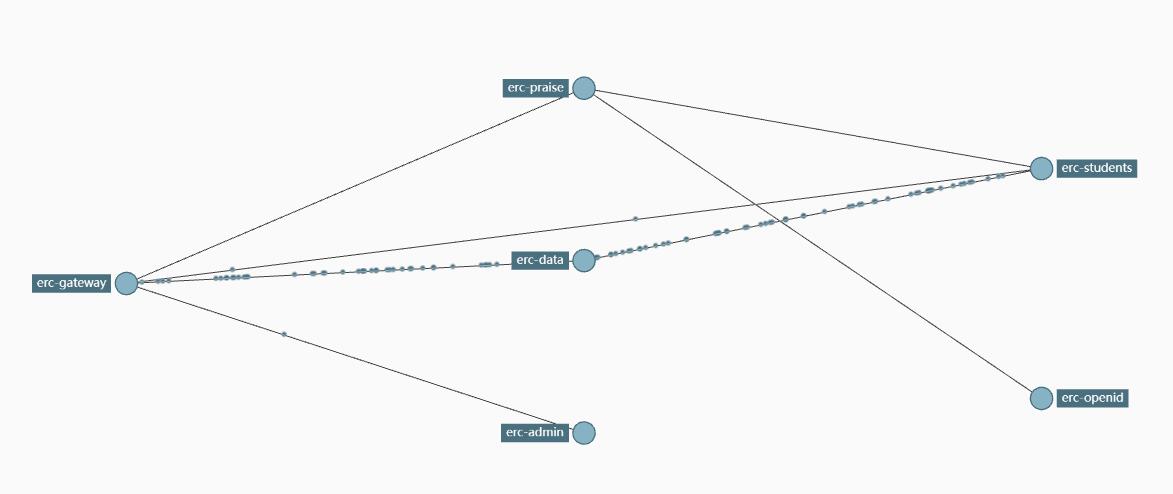
其中祝福功能和学生这块的业务比较多,牵扯到了远程过程调用时各服务对自己数据库的写操作,所以存在分布式事务问题,便加上undo_log表。
-
students表是主表,包含了数千条新生的基本信息,待学生报到更新。对应的controller层接口也比较多,业务层也比较复杂,是一个任务比较重的模块。
-
以上是4张表,在原先的boot项目中还有一个DataController,负责调用其余四个业务层,获取数据用于大屏展示,没有其自己的业务,也划分为单独一个模块。
-
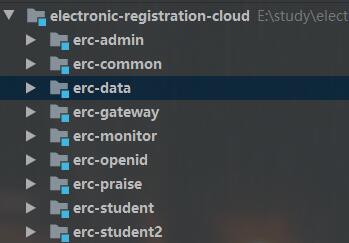
至此,一共将原先boot项目按功能划分为5各模块,其中
erc-admin、erc-openid、erc-praise、erc-student作为服务的提供方,erc-data模块作为服务的消费方;由于erc-student的任务较重,我便多起了一个实例erc-student2:
具体模块配置展示
-
由于多数模块的配置都大同小异,这里我以
erc-praise模块为例,两个初始配置文件application.yml、bootstrap.yml和erc-gateway模块的差不多,这里展示一下nacos上的配置:spring: jackson: date-format: yyyy-MM-dd HH:mm:ss time-zone: Asia/Shanghai servlet: multipart: # 开启 multipart 上传功能 enabled: true # 文件写入磁盘的阈值 file-size-threshold: 2KB # 最大文件大小 max-file-size: 200MB # 最大请求大小 max-request-size: 215MB zipkin: base-url: http://localhost:9411 sleuth: sampler: probability: 1 cloud: nacos: discovery: # nacos服务注册中心地址 server-addr: localhost:8848 sentinel: transport: # 配置Sentinel dashboard地址 dashboard: 127.0.0.1:8080 # 默认8719端口,假如被占用会自动从8719开始依次+1扫描,直至找到未被占用的端口 port: 8719 clientIp: localhost:9500 # 数据源基本配置 datasource: username: root password: 12345 url: jdbc:mysql://localhost:3306/erc_praise?useUnicode=true&characterEncoding=UTF-8&useJDBCCompliantTimezoneShift=true&useLegacyDatetimeCode=false&serverTimezone=UTC&useSSL=false&allowPublicKeyRetrieval=true driver-class-name: com.mysql.cj.jdbc.Driver type: com.alibaba.druid.pool.DruidDataSource seata: enabled: true application-id: ${spring.application.name} # Seata 应用编号,默认为 ${spring.application.name} tx-service-group: electroic-registration-cloud-group # Seata 事务组编号,用于 TC 集群名 # Seata 服务配置项,对应 ServiceProperties 类 service: vgroup-mapping: electroic-registration-cloud-group: default disable-global-transaction: false # Seata 注册中心配置项,对应 RegistryProperties 类 registry: type: nacos # 注册中心类型,默认为 file nacos: application: seata-server server-addr: 127.0.0.1:8848 group: SEATA_GROUP namespace: 21e2fe2e-3d5e-449b-9ff2-a87a9345742e username: nacos password: nacos config: type: nacos nacos: server-addr: 127.0.0.1:8848 group: SEATA_GROUP namespace: 21e2fe2e-3d5e-449b-9ff2-a87a9345742e username: nacos password: nacos #是否开启 swagger-ui swagger: enabled: true host: 127.0.0.1:${server.port} code: expirationTime: 86400000 management: endpoint: sentinel: enabled: true health: show-details: ALWAYS endpoints: web: exposure: include: '*' logging: level: io: seata: info feign: sentinel: enabled: true -
剩余无非是这个模块的controller、entity、mapper、service等,在单独一个微服务中都是大同小异的。这里展示一下feign远程调用
erc-student模块的代码:@FeignClient(value = "erc-students") public interface IStudentsService { @GetMapping(value = "/api/students/getByCartId") Students getByCartId(@RequestParam("cartId")String cartId); @GetMapping(value = "/api/students/getById") Students getById(@RequestParam("id")Integer id); @PutMapping(value = "/api/students/updateWishesById") boolean updateWishesById(@RequestParam("id")Integer id, @RequestParam("wishes")Integer wishes); } -
在自己的业务层也是通过spring注入IStudentService,可以说在Impl层的角度来看用起来就像是一个服务里的,很优雅!
@Service @Slf4j @RequiredArgsConstructor public class StudentPraiseServiceImpl extends ServiceImpl<StudentPraiseMapper, StudentPraise> implements IStudentPraiseService { private final StudentPraiseMapper studentPraiseMapper; //erc-student模块的服务 private final IStudentsService studentsService; //erc-openid模块的服务 private final IOpenIdService openIdService; @Override @GlobalTransactional public Boolean clickWish( String cartId, String openId ) { log.info("【学生身份证为:】" + cartId + "【当前用户的openid为】" + openId); Integer openIdCount = openIdService.selectCount(openId); ....... } } -
由于这个方法牵扯到其他服务对数据库的写操作,所以这里在方法上加上seata的
@GlobalTransactional,这样全局的事务就控制住了,真滴方便(但是底层实现确实相当麻烦)。
结果展示
大屏展示

- 有一些数据为null我就不知道了,毕竟代码不是我写的

报到页面

链路追踪
状态监控
附录
-
我的数据源使用druid,数据库是mysql。
-
其实这个问题当时我遇到的时候也是挺蒙的,排查了好久,发现是数据源代理的问题,当我在yml中把seata下的enable-auto-data-source-proxy: 改为了false,服务可以正常启动了,但是测试的时候发现事务控制不住,加了
@GlobalTransactional,而且seata控制台也输出rollback successfully了吗,但是事务确实没回滚。 -
之后从github官网的例子上看到需要加上配置类:
@Configuration public class SeataDataSourceAutoConfig { @Autowired private DataSourceProperties dataSourceProperties; @Bean @Primary public DruidDataSource druidDataSource(){ DruidDataSource druidDataSource = new DruidDataSource(); druidDataSource.setUrl(dataSourceProperties.getUrl()); druidDataSource.setUsername(dataSourceProperties.getUsername()); druidDataSource.setPassword(dataSourceProperties.getPassword()); druidDataSource.setDriverClassName(dataSourceProperties.getDriverClassName()); druidDataSource.setInitialSize(0); druidDataSource.setMaxActive(180); druidDataSource.setMaxWait(60000); druidDataSource.setMinIdle(0); druidDataSource.setValidationQuery("Select 1 from DUAL"); druidDataSource.setTestOnBorrow(false); druidDataSource.setTestOnReturn(false); druidDataSource.setTestWhileIdle(true); druidDataSource.setTimeBetweenEvictionRunsMillis(60000); druidDataSource.setMinEvictableIdleTimeMillis(25200000); druidDataSource.setRemoveAbandoned(true); druidDataSource.setRemoveAbandonedTimeout(1800); druidDataSource.setLogAbandoned(true); return druidDataSource; } /** * init mybatis sqlSessionFactory * @Param: dataSourceProxy datasource proxy * @Return: DataSourceProxy datasource proxy */ // @Bean // public SqlSessionFactory sqlSessionFactory(DataSource dataSource) throws Exception { // SqlSessionFactoryBean factoryBean = new SqlSessionFactoryBean(); // factoryBean.setDataSource(dataSource); // factoryBean.setMapperLocations(new PathMatchingResourcePatternResolver() // .getResources("classpath*:/mapper/*.xml")); // return factoryBean.getObject(); // } } -
为什么最后那个SqlSessionFactory我给注掉了,因为我使用MyBatis Plus的注解形式开发,不用xml,所以注掉了。而且不注的话会报ibatis的绑定错误。
-
(当然以上问题有些人不会遇到,暂时我还不知道原因)
部署
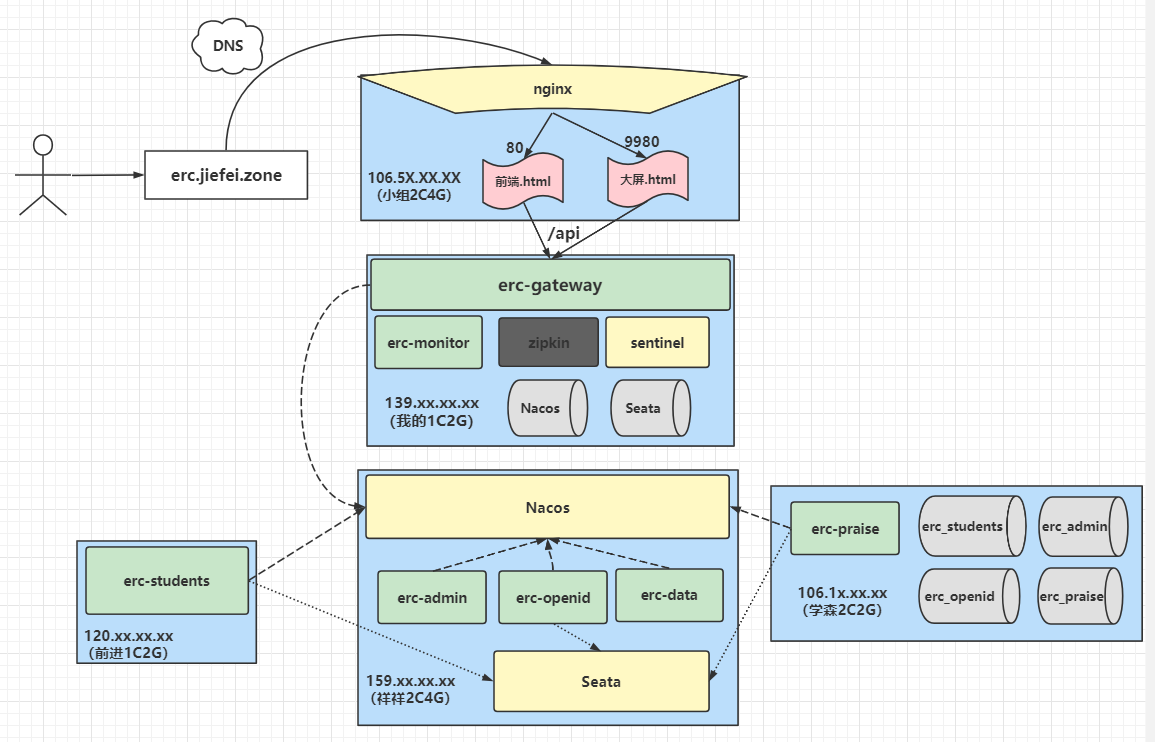
- 在服务注册到nacos上的时候默认使用的是内网ip,这就导致了一台服务器上的服务访问不到另一台服务器上的服务,需要服务在配置文件里声明公网ip。
- 那我们在真正部署的时候什么情况注册内网ip,什么时候注册公网ip?
6 条评论
感谢分享,谢谢
博客很好看,图画的很好
谢谢୧(๑•̀⌄•́๑)૭
谢谢