鉴于直播间数据治理项目中老数据库查询速度过慢(单表数据大于
3000w),减少查询字段、减少聚合函数、调整索引之后的查询还是需要几十秒,因此调研ClickHouse,打算将MySQL数据迁移至ClickHouse,再进行分析。
简介
ClickHouse 是一个用于联机分析(OLAP)的列式数据库管理系统(DBMS)。
ClickHouse 是 Yandex(俄罗斯最大的搜索引擎)开源的一个用于实时数据分析的基于列存储的数据库,其处理数据的速度比传统方法快 100-1000 倍。
ClickHouse 的性能超过了目前市场上可比的面向列的 DBMS,每秒钟每台服务器每秒处理数亿至十亿多行和数十千兆字节的数据。
我们首先理清一些基础概念:
- OLTP:是传统的关系型数据库,主要操作增删改查,强调事务一致性,比如银行系统、电商系统。
- OLAP:是仓库型数据库,主要是读取数据,做复杂数据分析,侧重技术决策支持,提供直观简单的结果。
(号称最快查询)
doris,两者都各有优缺,两个国内各大厂也都有使用,doris的文档就是国内编写的,有中文,学习起来会比较方便,之后看时间我再使用一下doris,两个做个对比。(
Apache Doris是由百度自主研发并开源的一款MPP分析型数据库产品,仅需亚秒级响应时间即可获得查询结果,有效地支持实时数据分析。Apache Doris的分布式架构非常简洁,易于运维,并且可以支持10PB以上的超大数据集)
为什么快?
ClickHouse 会在内存中进行GROUP BY,并且使用 HashTable 装载数据。并且注重 CPU L3级别的缓存,利用这些缓存
ClickHouse 最终选择了这些算法:对于常量,使用 Volnitsky 算法;对于非常量,使用 CPU 的向量化执行 SIMD,暴力优化;正则匹配使用 re2 和hyperscan 算法。
除了列式存储上的不同,ClickHouse 还有高效的数据压缩,默认使用LZ4算法,总体压缩比可达 8:1。ClickHouse 还采用了分布式多主架构提高并发性能,ClickHouse使读请求可以随机打到任意节点,均衡读压力,写请求也无需转发到master节点,不会产生单点压力。
ClickHouse 还有向量引擎,利用 SIMD 指令实现并行计算。对多个数据块来说,一次 SIMD 指令会同时操作多个块,大大减少了命令执行次数,缩短了计算时间。向量引擎在结合多核后会将 ClickHouse 的性能淋漓尽致的发挥出来。
ClickHouse 在索引上也有不同,采用了稀疏索引及跳数索引。同时还有很多 MergeTree,提供海量业务场景支持。
部署
以单节点docker部署为例:(docker hub官网)
在Docker Hub上clickhouse的镜像还是以yandex/clickhouse-server,使用居多;虽然官网已经把官方镜像改为clickhouse/clickhouse-server,但是Docker Hub的文档里还写着yandex/clickhouse-server。
(但要注意yandex/clickhouse-server的latest缺省版本已经比client低了,使用client连接时会报警告)
# 创建数据卷目录
mkdir -p /data/clickhouse
chmod -R 777 /data/clickhouse
# 拉取镜像
docker pull yandex/clickhouse-server
# 注意配置文件在/etc/clickhouse-server下,需要的可以再单独挂载
docker run -d --name clickhouse -p -p 8123:8123 --ulimit nofile=262144:262144 -v /data/clickhouse:/var/lib/clickhouse yandex/clickhouse-server
# 使用clickhouse-client连接并操作
docker run -it --rm --link clickhouse:clickhouse-server yandex/clickhouse-client --host clickhouse-server
clickhouse-server默认端口8123,client默认端口9000,以上创建的clickhouse默认不需要用户名密码,而且自动开启远程连接,所以是比较危险的,接下来我们修改用户名密码。
我们现在宿主机生成密文密码:(以密码为123456为例)
PASSWORD=$(base64 < /dev/urandom | head -c8); echo "123456"; echo -n "123456" | sha256sum | tr -d '-'回车之后会输出两行信息,第一行是明文密码123456,第二行就是密文(64位),我们将密文复制。
配置文件在/etc/clickhouse-server下,但是直接挂载此目录会报错,提示配置文件readonly(可能是我的操作问题),这里我们在容器内安装vim:
docker exec -it clickhouse bash
apt-get update
apt-get install vim片刻过后:vim /etc/clickhouse-server/users.xml
在里面找到<password></password>,我们将其改为<password_sha256_hex>刚才复制的64位密文</password_sha256_hex>
保存退出,exit退出容器,docker restart clickhouse重启容器
这个时候我们直接使用docker的clickhouse-client连接需要带上密码:
docker run -it --rm --link clickhouse:clickhouse-server yandex/clickhouse-client --host clickhouse-server --password 123456
连接的更多参数可以参考官方文档
--host, -h – The server name, ‘localhost’ by default. You can use either the name or the IPv4 or IPv6 address.
--port – The port to connect to. Default value: 9000. Note that the HTTP interface and the native interface use different ports.
--user, -u – The username. Default value: default.
--password – The password. Default value: empty string.
--query, -q – The query to process when using non-interactive mode. You must specify either query or queries-file option.
--queries-file, -qf – file path with queries to execute. You must specify either query or queries-file option.
--database, -d – Select the current default database. Default value: the current database from the server settings (‘default’ by default).
--multiline, -m – If specified, allow multiline queries (do not send the query on Enter).
--multiquery, -n – If specified, allow processing multiple queries separated by semicolons.
--format, -f – Use the specified default format to output the result.
--vertical, -E – If specified, use the Vertical format by default to output the result. This is the same as –format=Vertical. In this format, each value is printed on a separate line, which is helpful when displaying wide tables.
--time, -t – If specified, print the query execution time to ‘stderr’ in non-interactive mode.
--stacktrace – If specified, also print the stack trace if an exception occurs.
--config-file – The name of the configuration file.
--secure – If specified, will connect to server over secure connection.
--history_file — Path to a file containing command history.
--param_<name> — Value for a query with parameters.
--hardware-utilization — Print hardware utilization information in progress bar.
--print-profile-events – Print ProfileEvents packets.
--profile-events-delay-ms – Delay between printing ProfileEvents packets (-1 - print only totals, 0 - print every single packet).
使用
MySQL数据导入
很庆幸clickhouse为我们提供了及其方便的导入命令,让我们可以在线直接导入Mysql的表数据:(使用client连接)
CREATE TABLE table_name ENGINE = MergeTree ORDER BY table_primiry_key AS SELECT * FROM mysql('localhost:3306', 'database_name', 'table_name', 'username', 'password') - MySQL的主键必须为not null
- 其中table_name是表名,database_name是mysql数据库名
- 同时你还要改ip、端口、用户名、密码,引擎选择
MergeTree,这个是clickhouse中的主要引擎 - ORDER BY 后面是数据导入时的一个排序依据,需要和源表中的字段一致
回车之后便开始导数据,还有行数、磁盘使用大小、速度实时提示

可视化工具DBeaver
DBeaver是一个数据库的可视化工具,或许你知道的以workbench、navicat、SQLyog居多,但是DBeaver绝对是支持数据类型最多,基本上支持连接市面上流行的所有数据库(关系型、非关型系都有)
(还有一个专门为ClickHouse做可视化的工具叫作DBM,但是感觉功能太少,目前还不是很完善)
DBeaver下载地址
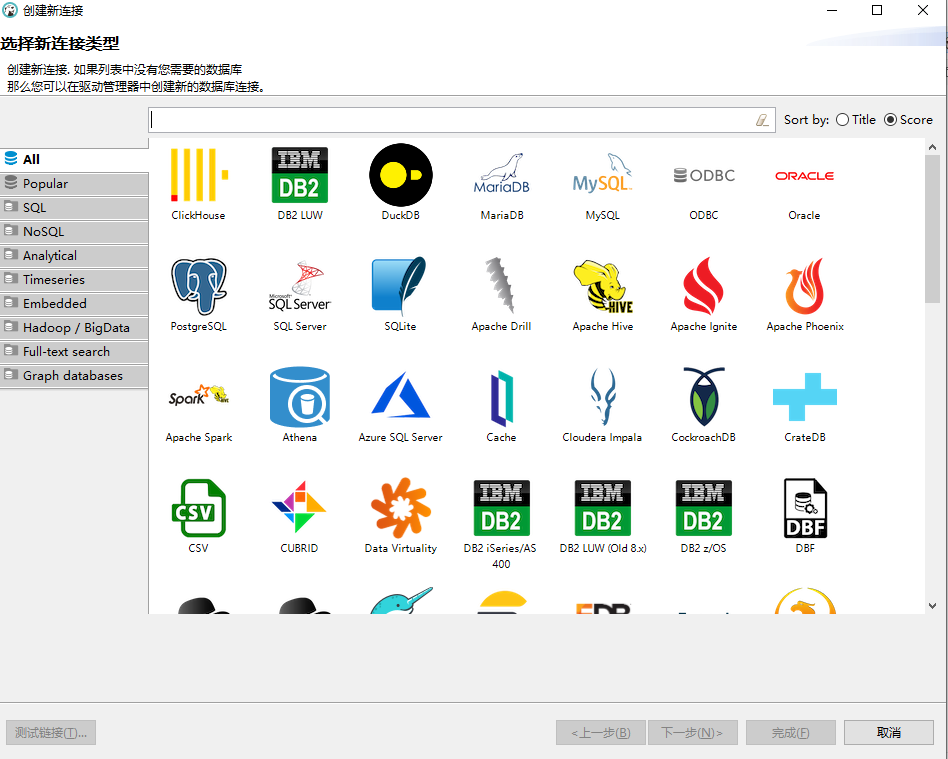
打开之后可以看出支持的数据库确实特别多,我们选择ClickHouse,输入主机地址和端口,如果你设置了密码那么用户名默认为default,密码为你设置的密码。
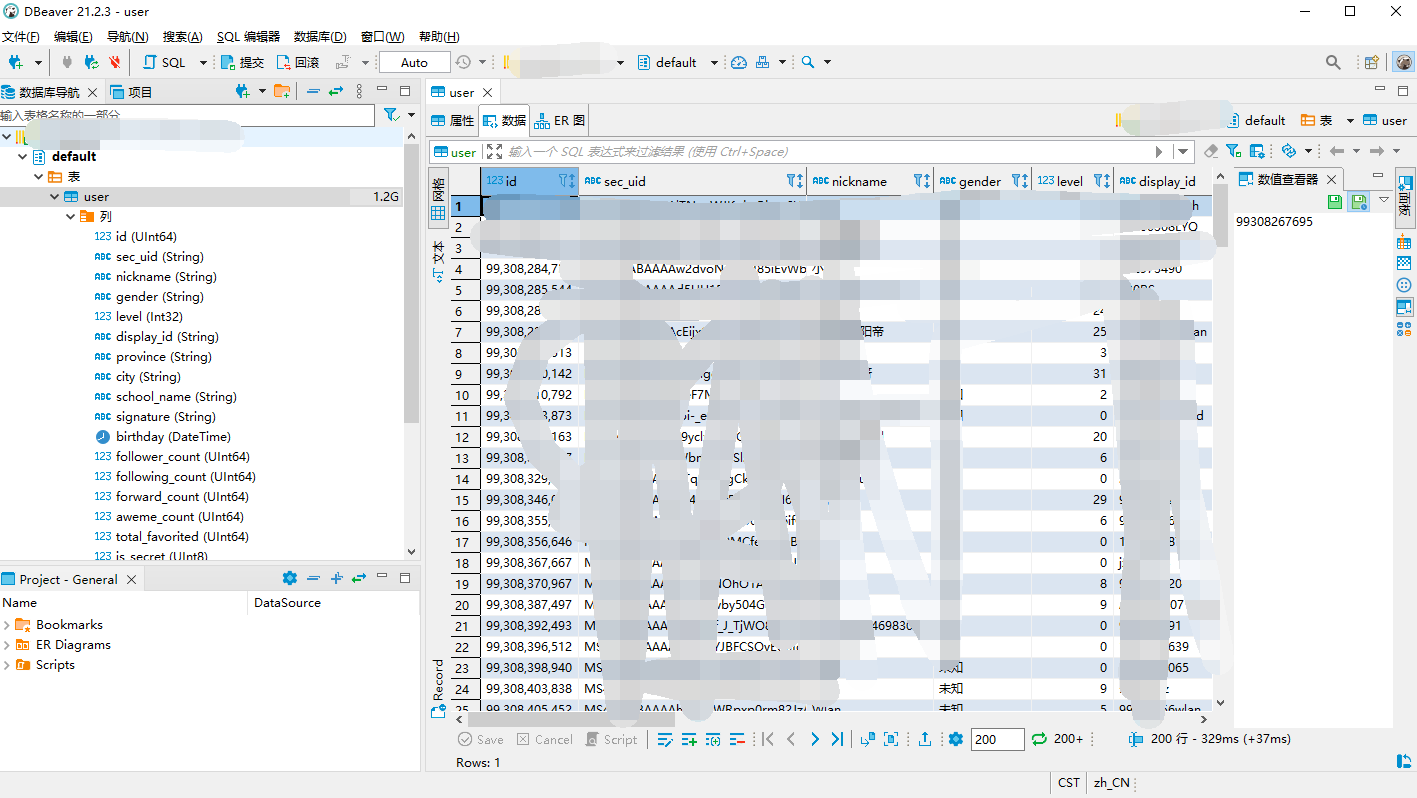
我们点击测试链接,第一次会下载连接驱动,需要等一段时间,之后提示连接成功,即可操作了:
2 条评论
快手的列式数据库用的是clickhouse,能轻松应对几十亿级数据;另外数据分析用的比较多的是hive
ok